
- 11 Creative Print Ideas Using Canon Paper and Pixma Printer
-

Hello!
We've noticed that you are in .
Visit Canon .
Hayley Sinnatt (aka @hayleandshine) is a Melbourne-based Illustrator/Artist, specialises in Illustration and Fine Art, but also loves to bring her artwork to life through animation.
She works out of her home studio on beautiful Wurundjeri Country (Melbourne), capturing the colours and vibrancy of the world around her.
We asked Hayley to share her creative process and fun ideas for using Canon paper – including matte photo paper, printable magnet paper, glossy photo paper – and the PIXMA TS9560a printer to bring her designs off the screen and into the real world.
Discover fun, family-friendly ways to use your photo and magnet paper with a Canon PIXMA printer.
There’s something I love about printing at home - spending a day in my studio enjoying craft and having a play on a cozy afternoon with friends. With Canon’s creative print packs and their PIXMA TS9560a printer, there’s lots of fun to be had coming up with crafts and gift ideas. From printable magnets to cards and scrapbooking, there’s heaps of inspiration and ideas to explore, and at the moment you can get a bonus print pack with any eligible purchase until the end of July.
Here’s some crafty things I loved putting together to get you started!
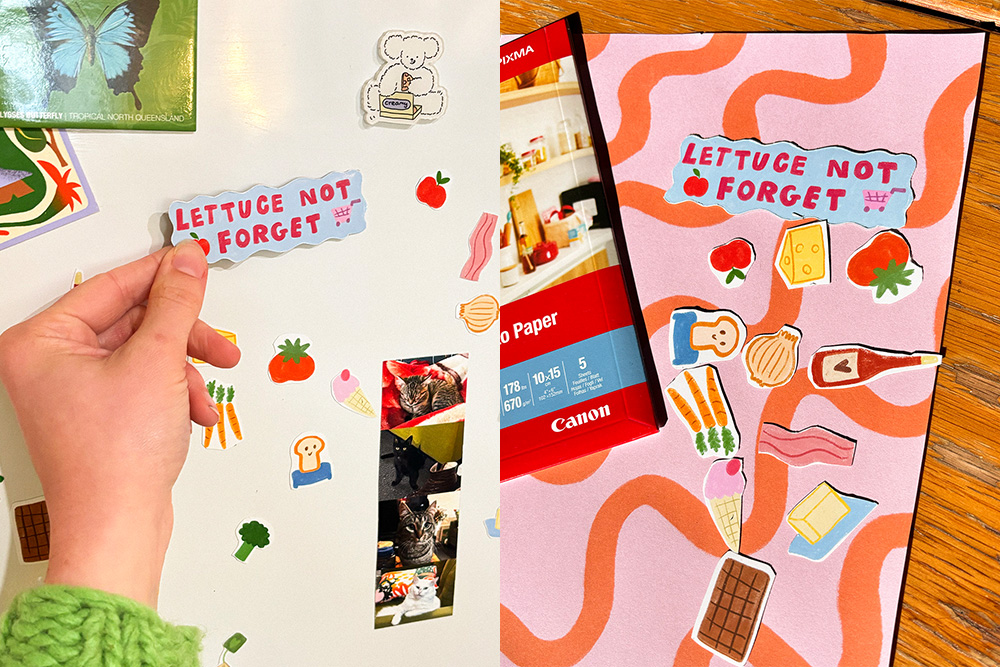
Make a cute and interactive shopping list for your fridge! I love the vibrant colours of Canon’s PIXMA TS9560a printer, so I designed some cute grocery illustrations to create an interactive visual shopping list for our sharehouse fridge. Stick them to any magnetic surface and add some colour and play to your kitchen.
How to make it:
1. Create a fun design on your computer and use photos or drawings of grocery elements, and come up with a silly shopping list title. I used ‘Lettuce not forget.
2. Using Canon’s magnetic printing paper, print your design and cut out all the elements.
3. Stick them to any magnetic surface like your fridge to keep track of your groceries at home.
Extra tip: For the best results when using Canon Magnetic Photo Paper, set your printer to the correct media type and quality via the print settings menu. The PIXMA TS9560a handles magnetic sheets up to 0.3mm thick, ideal for sturdy fridge magnets.
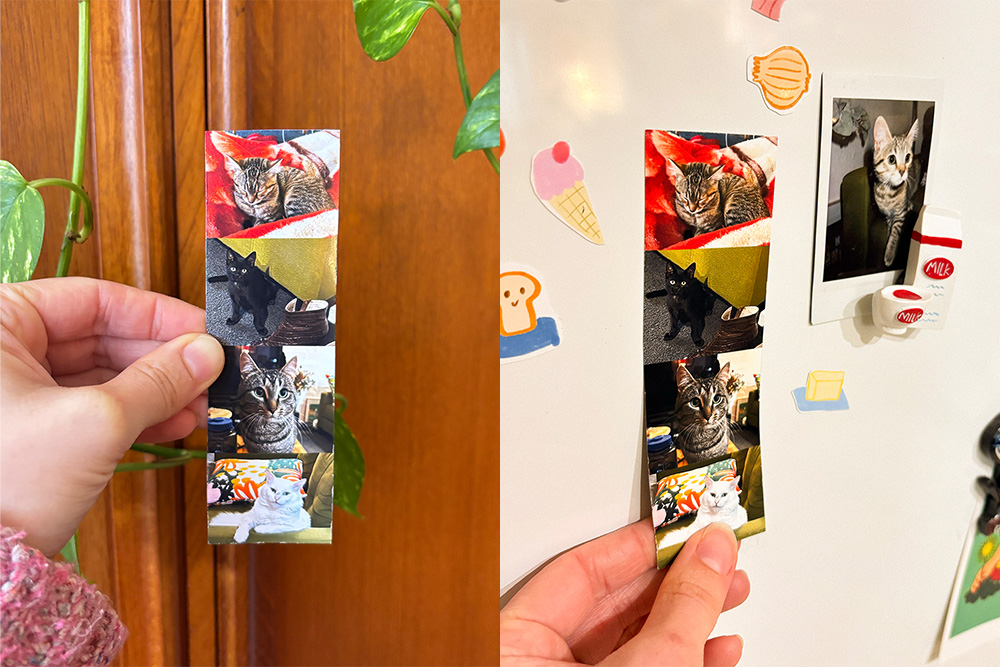
Recreate a photo booth print out and find your favourite photos of your pets, capturing their best shots and display them around your home or at work on any magnetic surface.
How to make it:
1. Print small photos into a sheet of magnetic photo paper and cut them out into strips. The Canon PIXMA TS9560a printer makes it easy to print right to the edge, or include a white border to capture that classic Photo Booth print style.
2. Display them on your fridge or magnetic board!
Extra tip: When printing photo strips, adjust the Canon Easy-PhotoPrint Editor layout settings to fit multiple shots in one go. Use borderless printing on the PIXMA TS9560a for a clean edge-to-edge finish, or enable bordered printing for a retro photobooth look.
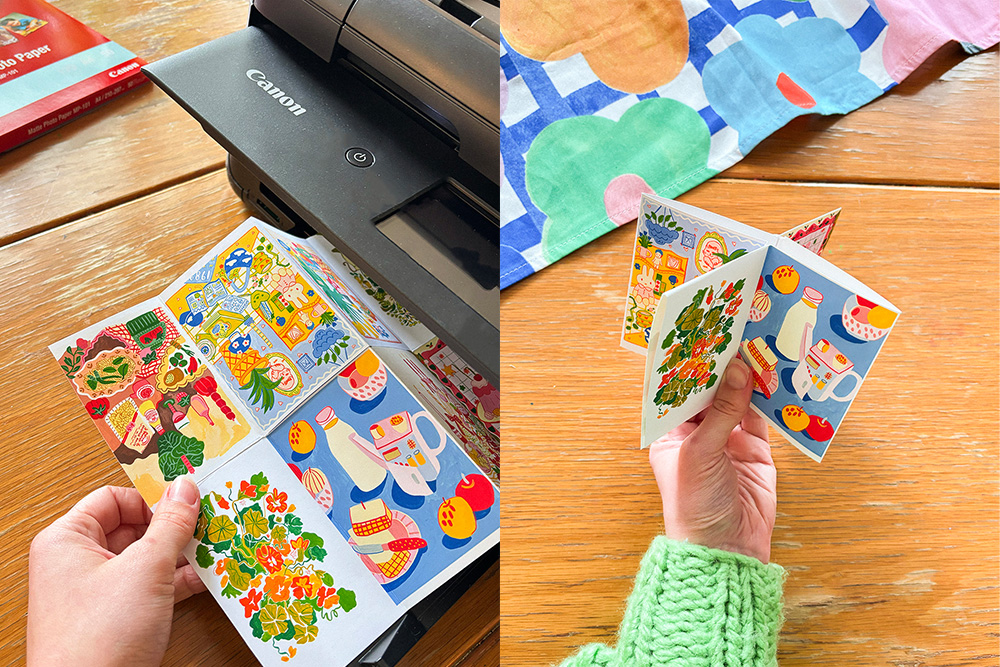
Create a foldable mini zine using a sheet of A4 Matte photo paper. This is a fun craft idea for capturing travel memories, your favourite artworks, recipes or photos of friends into a mini keepsake book for you to gift to friends.
How to make it:
1. Arrange 4x2 photos onto a landscape A4 sheet on your computer. Make sure to arrange photos on the top row upside down, so that the images are all the right way up when folded.
2. Print on your A4 sheet of Matte photo paper on your Canon printer.
3. Make fold lines around each picture, and cut a line in the centre of the page ready for folding.
4. Fold the pages together into a cross shape, and sit them flat together into a mini booklet.
5. Enjoy flicking through your mini zine.
Extra tip: Use the rear tray of the PIXMA TS9560a when feeding Canon’s Matte Photo Paper to reduce curling and ensure better alignment. For a crisp fold, score along fold lines with a bone folder or the back of a butter knife before folding.
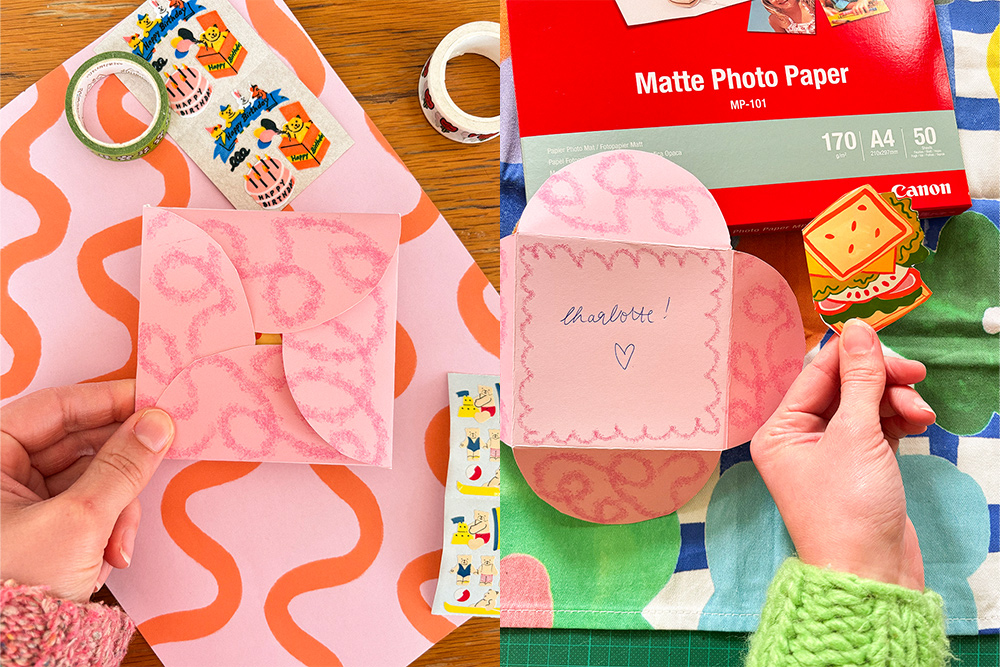
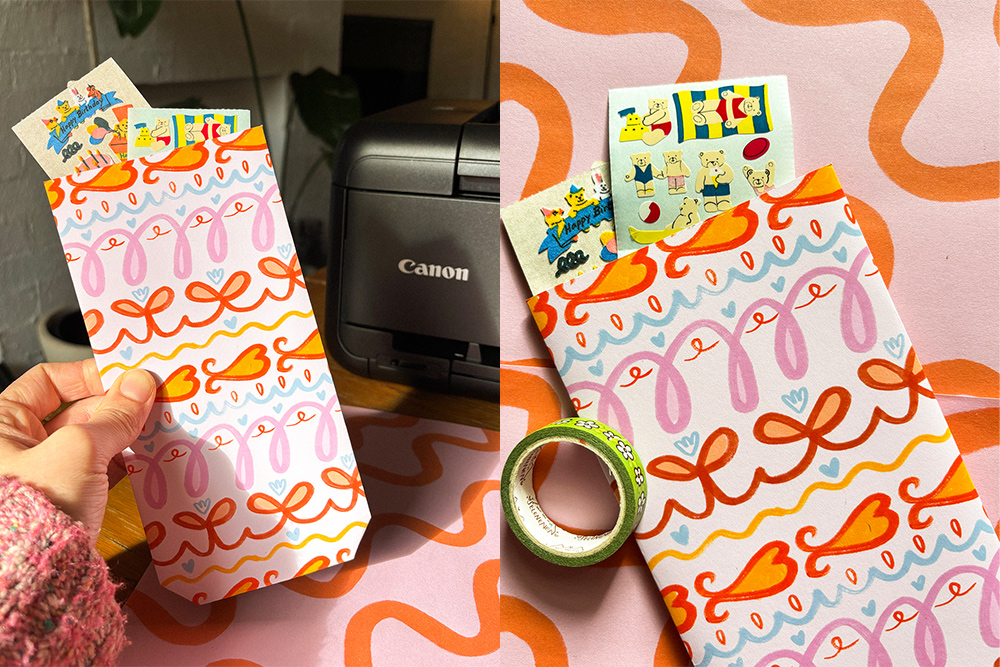
Create a mini foldable envelope for a small greeting card or invitation. With your Canon printer, you can design a packaging template for printing onto Canon’s A4 matte photo paper. This stock is perfect for your more 3d foldable projects with fun colours and easy to assemble yourself for all your gifting needs.
How to make it:
1. Design a template guide line and print on your A4 matte photo sheet.
2. Cut out the template and fold the 4 envelope sides into the centre.
3. Fold the curved edges together so the envelope closes, or use wash tape or stickers to seal it closed with your card inside.
Extra tip: Canon’s A4 Matte Photo Paper is a great weight for folding – around 170gsm – which holds its shape but is still easy to score. Use the PIXMA TS9560a’s rear tray to handle heavier stocks like this more reliably.
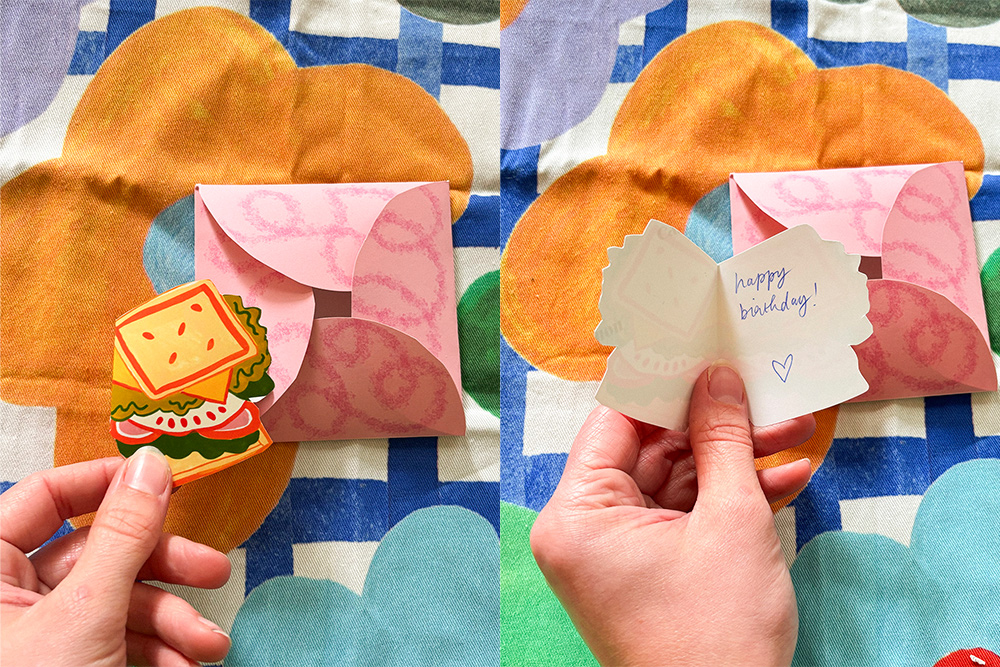
Greeting cards are a super easy craft idea to add something unique and thoughtful to your gifts, and with the Canon PIXMA TS9560a, you can create your own customised greeting cards and print on a variety of paper stocks from your print packs. I decided to make a mini sandwich style greeting card for something a bit different, printing on the Glossy photo paper for some extra shine.
How to make it:
1. Design your greeting card and print onto the square glossy photo paper.
2. Cut out your card and fold in half, write a personal note on the inside and pop into your handmade envelope.
3. Attach to your gift with washi tape.
Extra tip: When printing on Canon Glossy Photo Paper, avoid touching the surface straight after printing to prevent smudges – allow a few minutes for the ink to dry fully. The PIXMA TS9560a supports high-res printing up to 4800 x 1200 dpi for sharp photo output.
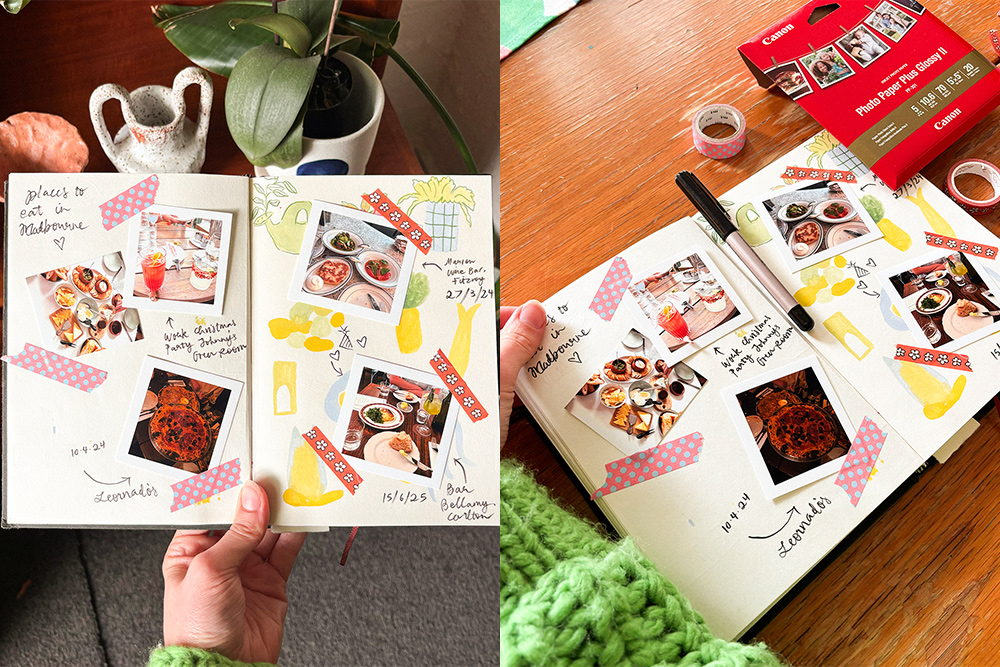
I love a cozy scrapbooking afternoon at home, capturing my favourite memories and cherishing fun activities and moments with loved ones. I created a scrapbooking series showcasing all my favourite places I’ve eaten at in Melbourne’s Northside suburbs this year, using a few of the hundreds of food photos on my phone I never usually look at again. Printing on canon’s glossy photo paper adds an extra touch, paired with illustrations and layered collages.
How to make it:
1. Choose a theme and Scroll back to your favourite moments you’ve captured in your photo library.
2. Print photos onto a square sheet of Glossy photo paper on your Canon printer.
3. Cut out each photo and stick them into your journal with all the cute washi tapes and paper cut outs. Add some notes to remember the dates and places of your favourite moments.
Extra tip: Canon Glossy Photo Paper brings out contrast and saturation in food or travel photos especially well.
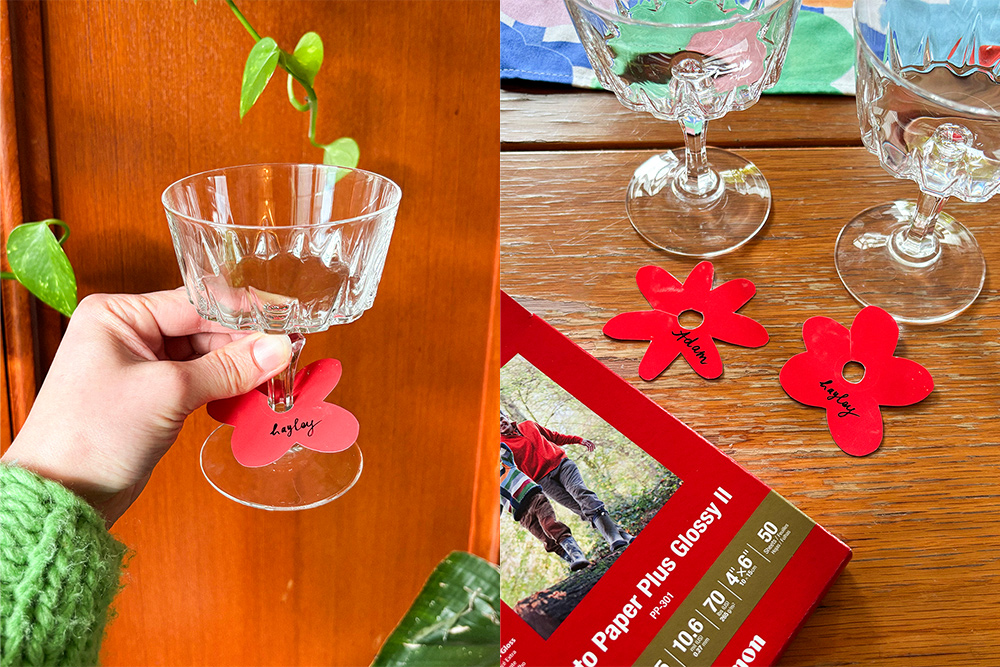
I love hosting events at home so I created some customised shaped tags for wine glasses. They make a beautiful addition to your dinner parties, and your guests leave with a little keepsake from you- and also don’t loose track of their glass! Canon’s glossy photo paper is durable and stylish to create something a bit special for your events.
How to make it:
1. Choose a flower or circle shape (or design your own unique shape) and print out the design onto Canon’s Glossy Photo Paper.
2. Cut out the shape as well as a circle in the middle to fold around the glass stem.
3. Write your guests name onto the flower shape and attach to their glasses.
Extra tip: For curved cutting (like flower shapes), use small craft scissors or a precision cutting blade. Canon Glossy Photo Paper is 200gsm, which gives durability for party settings without being too thick to fold.
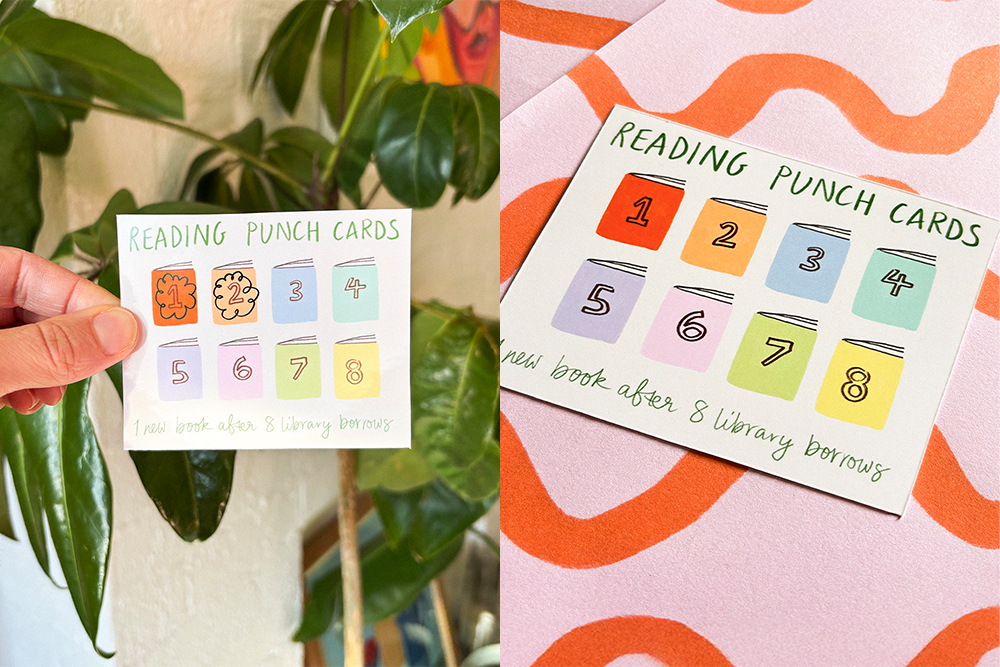
Keep track of the milestones for your favourite hobby with punchable mini cards that can fit in your wallet. Inspired by coffee shop loyalty cards, I love keeping track of my progress for reading books, so I created a ‘book punch card’ to keep track of my library reads. Every 8 books I read means I get to treat myself to a new book from my favourite book store!
How to make it:
1. Create a business card size design and decorate based on the punch card theme you’ve chosen.
2. Print onto glossy photo paper and cut out the rectangle shape.
3. Store in your wallet and punch a hole or cross out each book as you go!
Extra tip: You can print multiple punch card templates per page using Canon’s Easy-Layout Editor. Use Glossy Photo Paper for durability – it’s less prone to tearing in your wallet, and keeps ink crisp for marking or hole-punching.
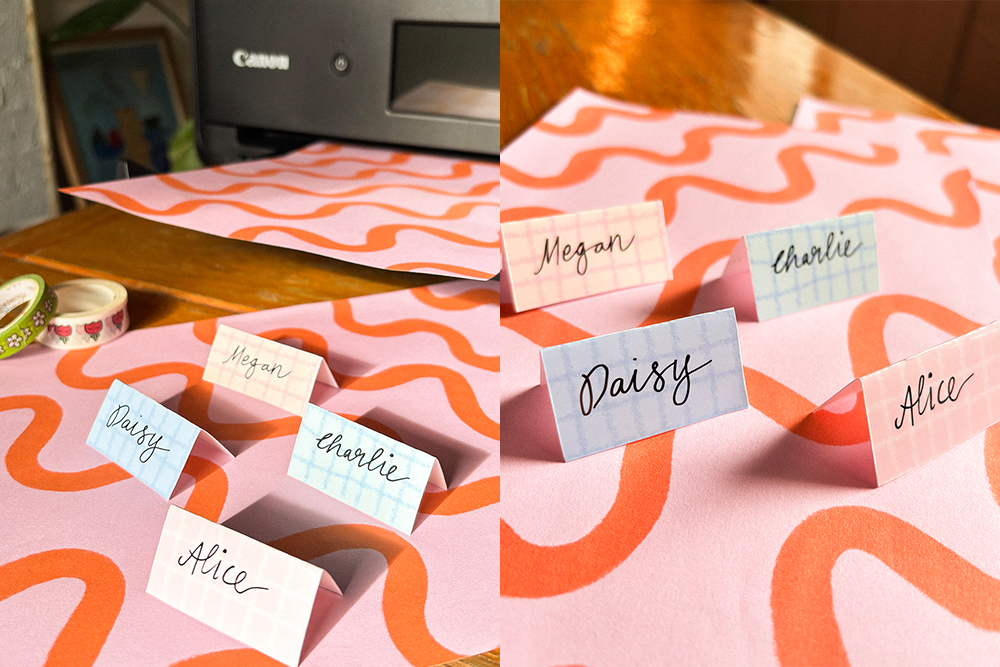
Personalise your dinner party hosting with individual placards for your guest at the table. Cards can be passed around with thoughtful notes written to each friend, and creates a sweet keepsake at the end of the night to pin on your photo wall.
How to make it:
1. Design a placecard template and add your guests names, or a photo of them on the front.
2. Using your Canon PIXMA TS9560a, print onto a sheet of glossy photo paper and cut into placecard.
3. Fold in half and arrange on table for dinner party.
Extra tip: For a photo-based placecard design, consider using the My Image Garden software that comes with Canon printers – it makes adding text to photos easy. Use Glossy Photo Paper for a polished, professional look.
Create a thoughtful care package to send to your friends when you’re thinking of them! Make a simple envelope-style sleeve by folding an A4 sheet of paper, to fill with thinking of you notes, stickers, lollies, and any small things you want to gift to your friend. Printing on canon’s A4 matte paper makes it easy to customize with fun collages, draw on the outside and add your own special touch to gift your loved ones.
How to make it:
1. Create a colourful design on your a4 canvas to print onto matte paper. Add a fun pattern to the design and any photos or illustrations to brighten your friends day.
2. Using your Canon printer, print onto your A4 matte photo paper.
3. Fold both the left and right edges of the paper inward, fold the bottom edge of the paper upwards, you can secure the top flap by folding in the corners to create triangles and gluing them down, or you can use tape to hold the flap in place.
4. Fill the sleeve with some thoughtful keepsakes for your care package and gift to your friends.
Extra tip: Folding A4 into sleeves works best with Matte Photo Paper, which is flexible and absorbs ink well for drawn-on designs. Print in draft mode if you want a lightly saturated base that’s easier to customise with pens or stickers afterward.
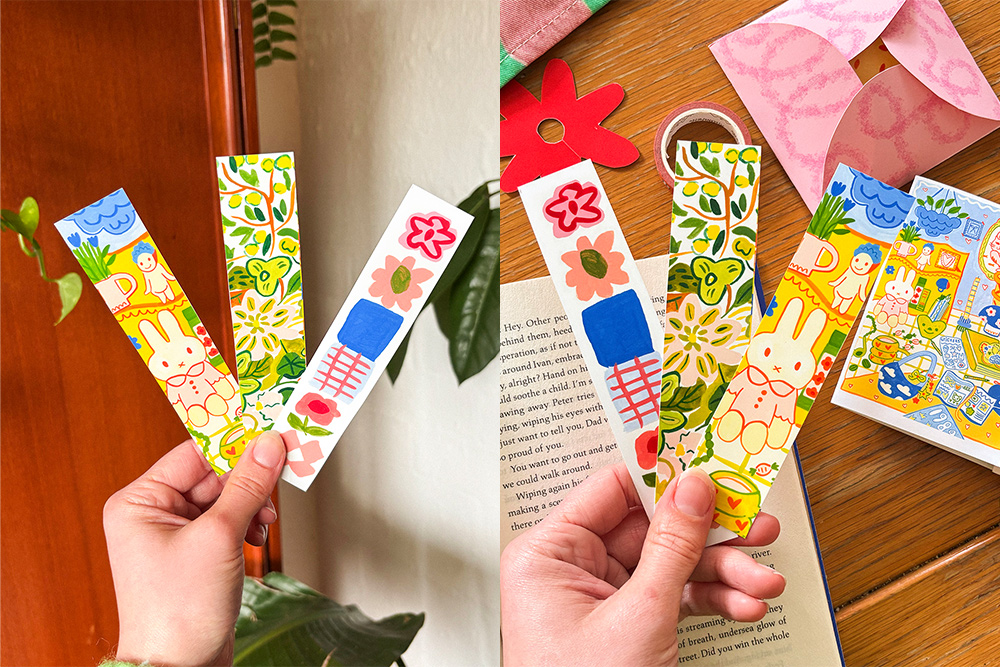
Creating your own bookmarks is a fun and easy project that adds a personal touch to your daily reads. Not only are they super cute, but they also make flipping through your favorite pages a little more stylish and fun. I used some of my own artwork but you could also use photos to make them a bit more personal!
How to make it:
1. Choose a fun print, favorite pattern, or vibrant color palette that reflects your style. You can use a template, use some photos or even draw your own.
2. Print your design on Canon Glossy Photo Paper - this gives your bookmark a sleek finish and makes the colors really pop.
3. Cut your printed sheet into neat strips, and you’ve got a set of custom bookmarks ready to brighten up your next read!
Extra tip: Laminate your Glossy Photo Paper bookmarks after cutting for added durability – especially if gifting them. The PIXMA TS9560a's fine ink droplet system ensures crisp edges on hand-drawn or scanned artworks for clean, print-ready results.
There’s something special about turning your photos into real, hold-in-your-hand creations – whether it’s fridge magnets, party keepsakes, or crafty gift tags. With a few sheets of Canon’s photo paper and the versatile PIXMA TS9560a printer, you’ve got everything you need to make something meaningful, fun and entirely your own.
To see more of Hayley’s work and creativity, check out her profiles below.
Instagram: @hayleandshine
Website: Hayle and Shine
Disclaimers:
¹ Printer media compatibility varies by model. Please verify your printer’s supported paper types and thickness before printing on any media.

Canon MegaTank: Why you need a continuous ink tank printer

How MAXIFY MegaTank Small Business Printers Can Save You Money

Does your printer drink too much ink? Follow our top tips to get the most our of your Canon printer with Genuine Canon Inks.